
Ethernet, WiFi and 4G
Welcome to this guide to network connections. The HAI-P200-4G controller has two Ethernet ports, a WiFi radio and a 4G modem. This guide explains how to configure each of those links, how the controller picks the one that carries the Internet, and how to share that connection with your equipment.
It all happens in the interface’s Connection menu, which gathers the Ethernet, WiFi, 4G Modem, VPN Tailscale and Connection Test pages.
Prerequisites
Section titled “Prerequisites”- The HAI-P200-4G controller, powered up
- HAI-OS, reachable from a browser (see First connection)
- For 4G: a SIM card with a data plan, and your operator’s settings (APN, and a PIN code if applicable)
Overview
Section titled “Overview”| Link | Name in the interface | Role | Factory configuration |
|---|---|---|---|
| Ethernet, upper port | eth0 | Company network, wired Internet output | DHCP |
| Ethernet, lower port | eth1 | Local machine network: PLC, maintenance PC | Static IP 192.168.1.16, mask 255.255.255.0 |
| WiFi | wlan0 | Client of an existing WiFi network, or access point | Client mode, no network remembered |
| 4G | wwan0 | Mobile Internet, backup or main | Disabled |
How the controller picks its Internet output
Section titled “How the controller picks its Internet output”Several links can be active at once. Every 15 seconds, the controller checks which one really gives access to the Internet, by sending a ping through each link, in this order of preference:
- Ethernet eth0
- Ethernet eth1
- WiFi wlan0
- 4G wwan0
The first link that answers carries the controller’s Internet traffic. In practice:
- A cable plugged into a network with no Internet (a PLC’s network, for example) is never chosen, even if it is “connected”.
- 4G is only used if nothing else answers. As long as a wired or WiFi link works, it is not even tested: this mechanism uses no mobile data.
- An unplugged cable is detected in about a second, and the switchover is immediate.
- When a higher-priority link comes back, the controller waits for two successful checks in a row before switching back to it, to avoid flapping on a failing cable.
- A link that stops answering is abandoned after three consecutive failures, that is, about 45 seconds.
The local networks stay reachable throughout: a port connected to a PLC keeps talking to it, whether or not it carries the Internet output.
The footer icons
Section titled “The footer icons”At the bottom of every page, three icons sum up the state of the links, refreshed every 10 seconds:
- WiFi: green when the controller is connected to a WiFi network. It takes the shape of a broadcast antenna when the access point is running.
- 4G: orange when the mobile connection is established.
- VPN: green when Tailscale is connected.

Ethernet
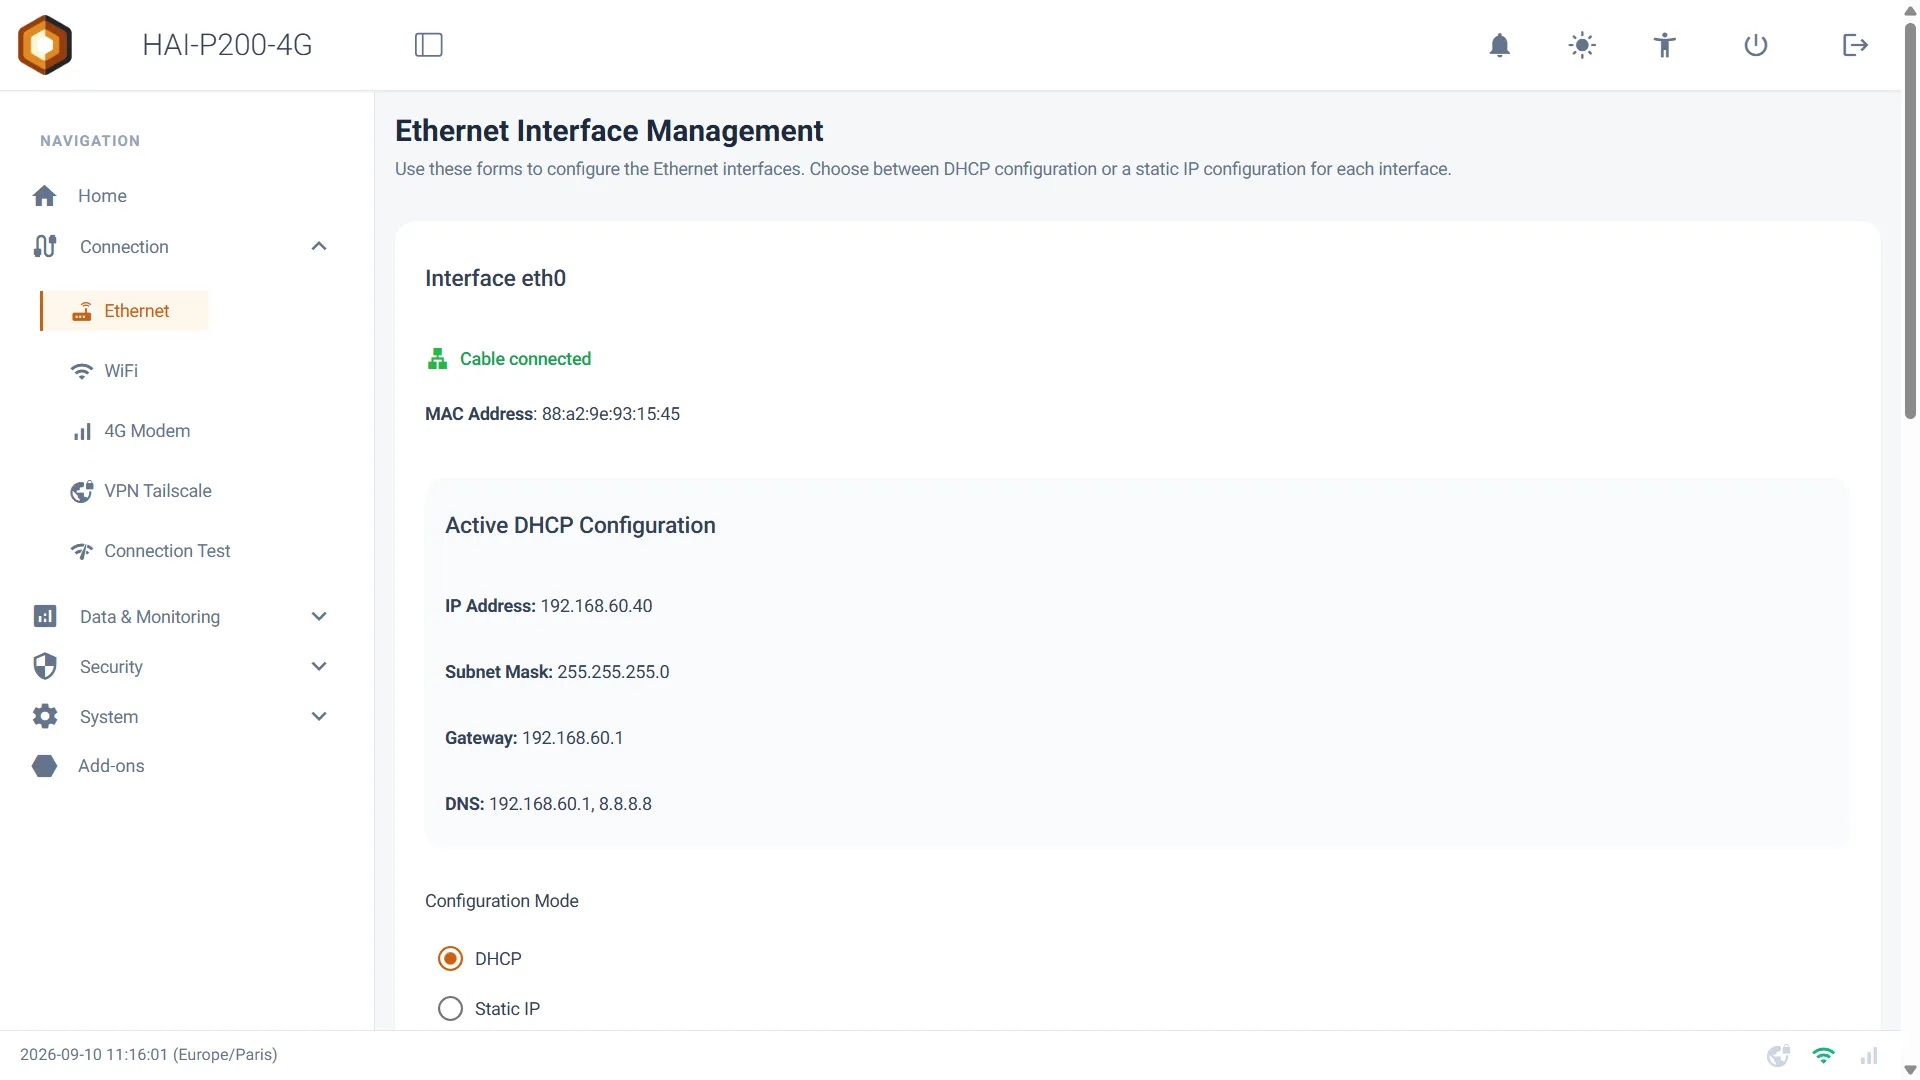
Section titled “Ethernet”Go to Connection > Ethernet. The page shows one card per port: Interface eth0 and Interface eth1.
Reading a port’s state
Section titled “Reading a port’s state”At the top of each card:
- Cable connected (green) or No cable connected (red) tells you whether a cable is physically present, refreshed every 3 seconds. Status unknown means the port is not seen by the system.
- The Internet output badge appears on the port that currently carries the controller’s Internet output.
- MAC Address: the port’s hardware address, useful for a DHCP reservation on your network.
- In DHCP mode, the Active DHCP Configuration block shows the address actually obtained: IP Address, Subnet Mask, Gateway, DNS.
Configuring a port for DHCP
Section titled “Configuring a port for DHCP”- In Configuration Mode, choose DHCP. The address fields grey out.
- Click Apply.
The port restarts and asks the network for an address. The Configuration applied for eth0. notification confirms the operation, and the Active DHCP Configuration block updates.
Configuring a port with a static IP
Section titled “Configuring a port with a static IP”- In Configuration Mode, choose Static IP.
- Fill in IP Address, Subnet Mask, Gateway and DNS. Several DNS servers can be entered, separated by commas. The gateway and the DNS servers are optional.
- Click Apply.
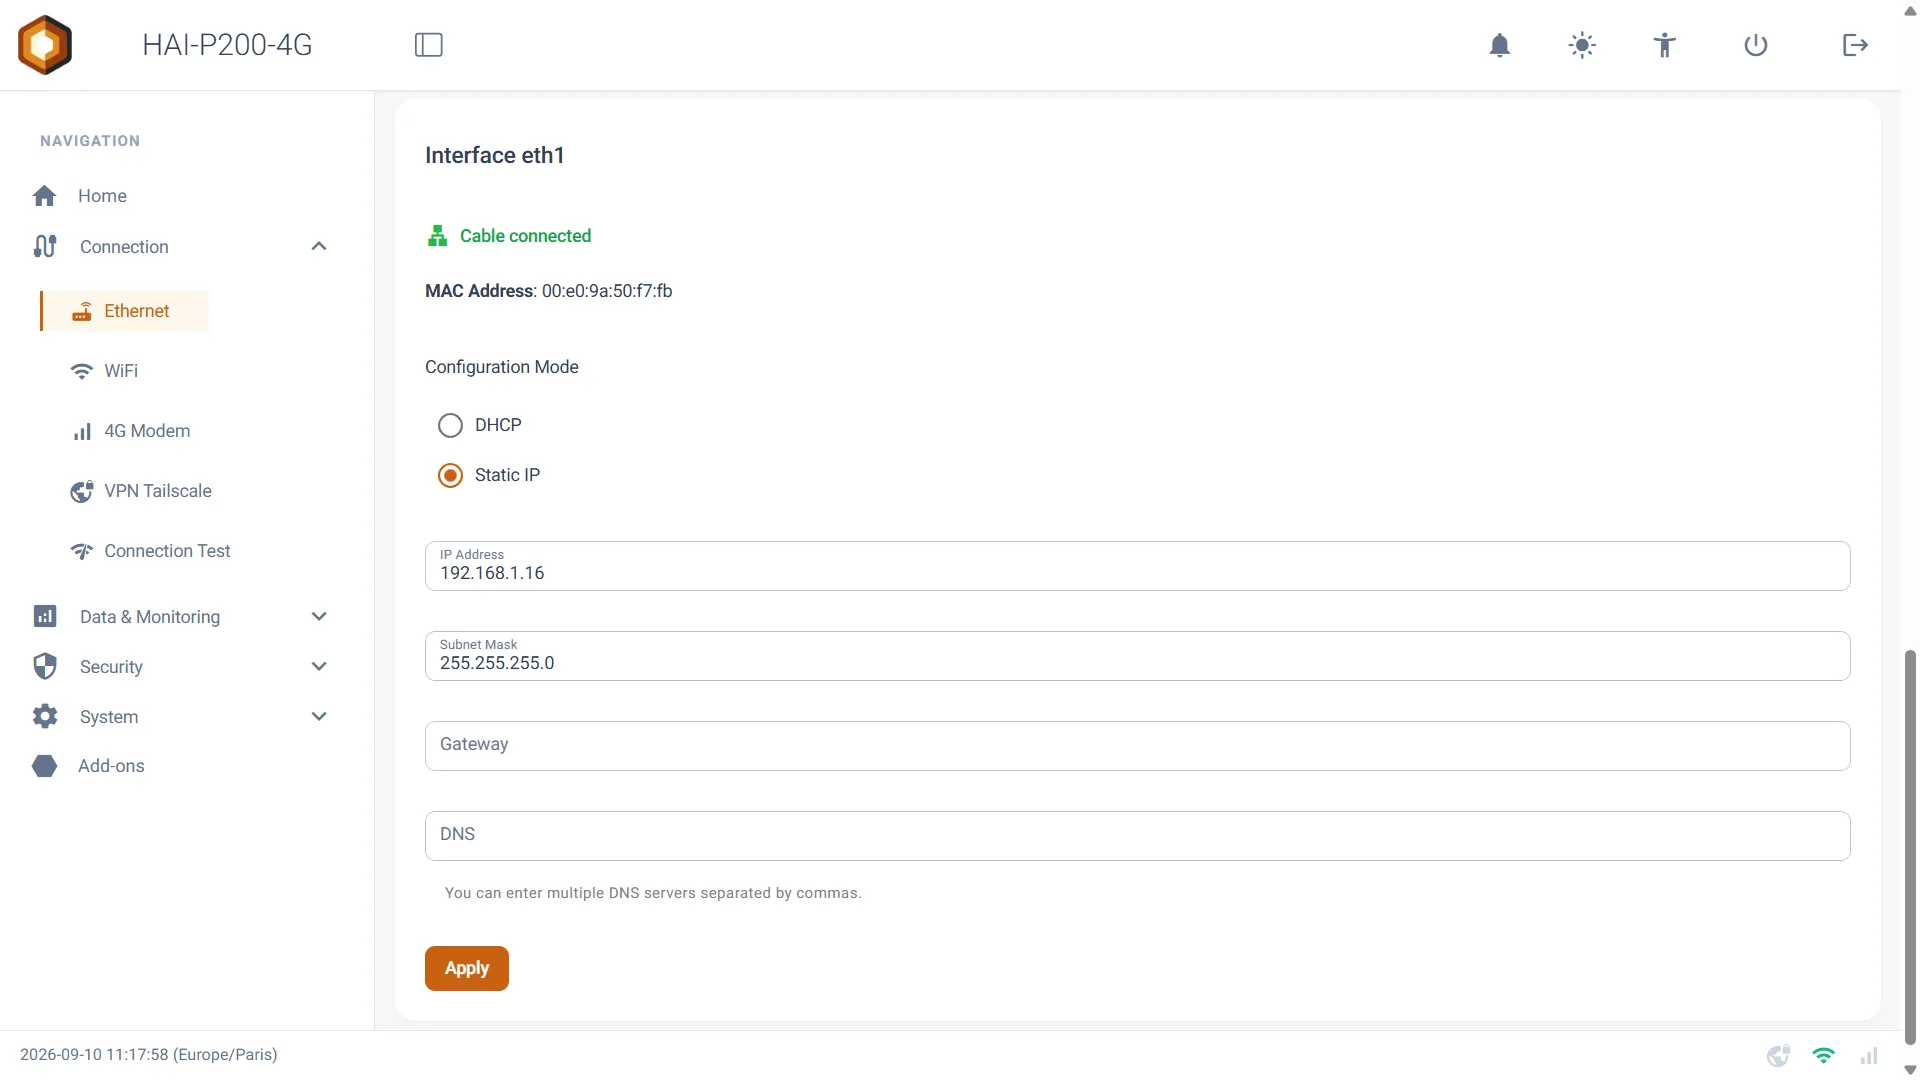
The change is applied immediately, with no controller restart. If the values are refused, the Failed to apply configuration for eth0. notification appears: check the format of the addresses.
Sharing the eth0 connection to eth1
Section titled “Sharing the eth0 connection to eth1”The controller can act as a router for the equipment plugged into eth1, giving it Internet access through eth0. Under the Interface eth0 card:
- Turn on the Enable connection sharing switch.
- Click the APPLY button just below it (distinct from the Apply button of the address configuration).
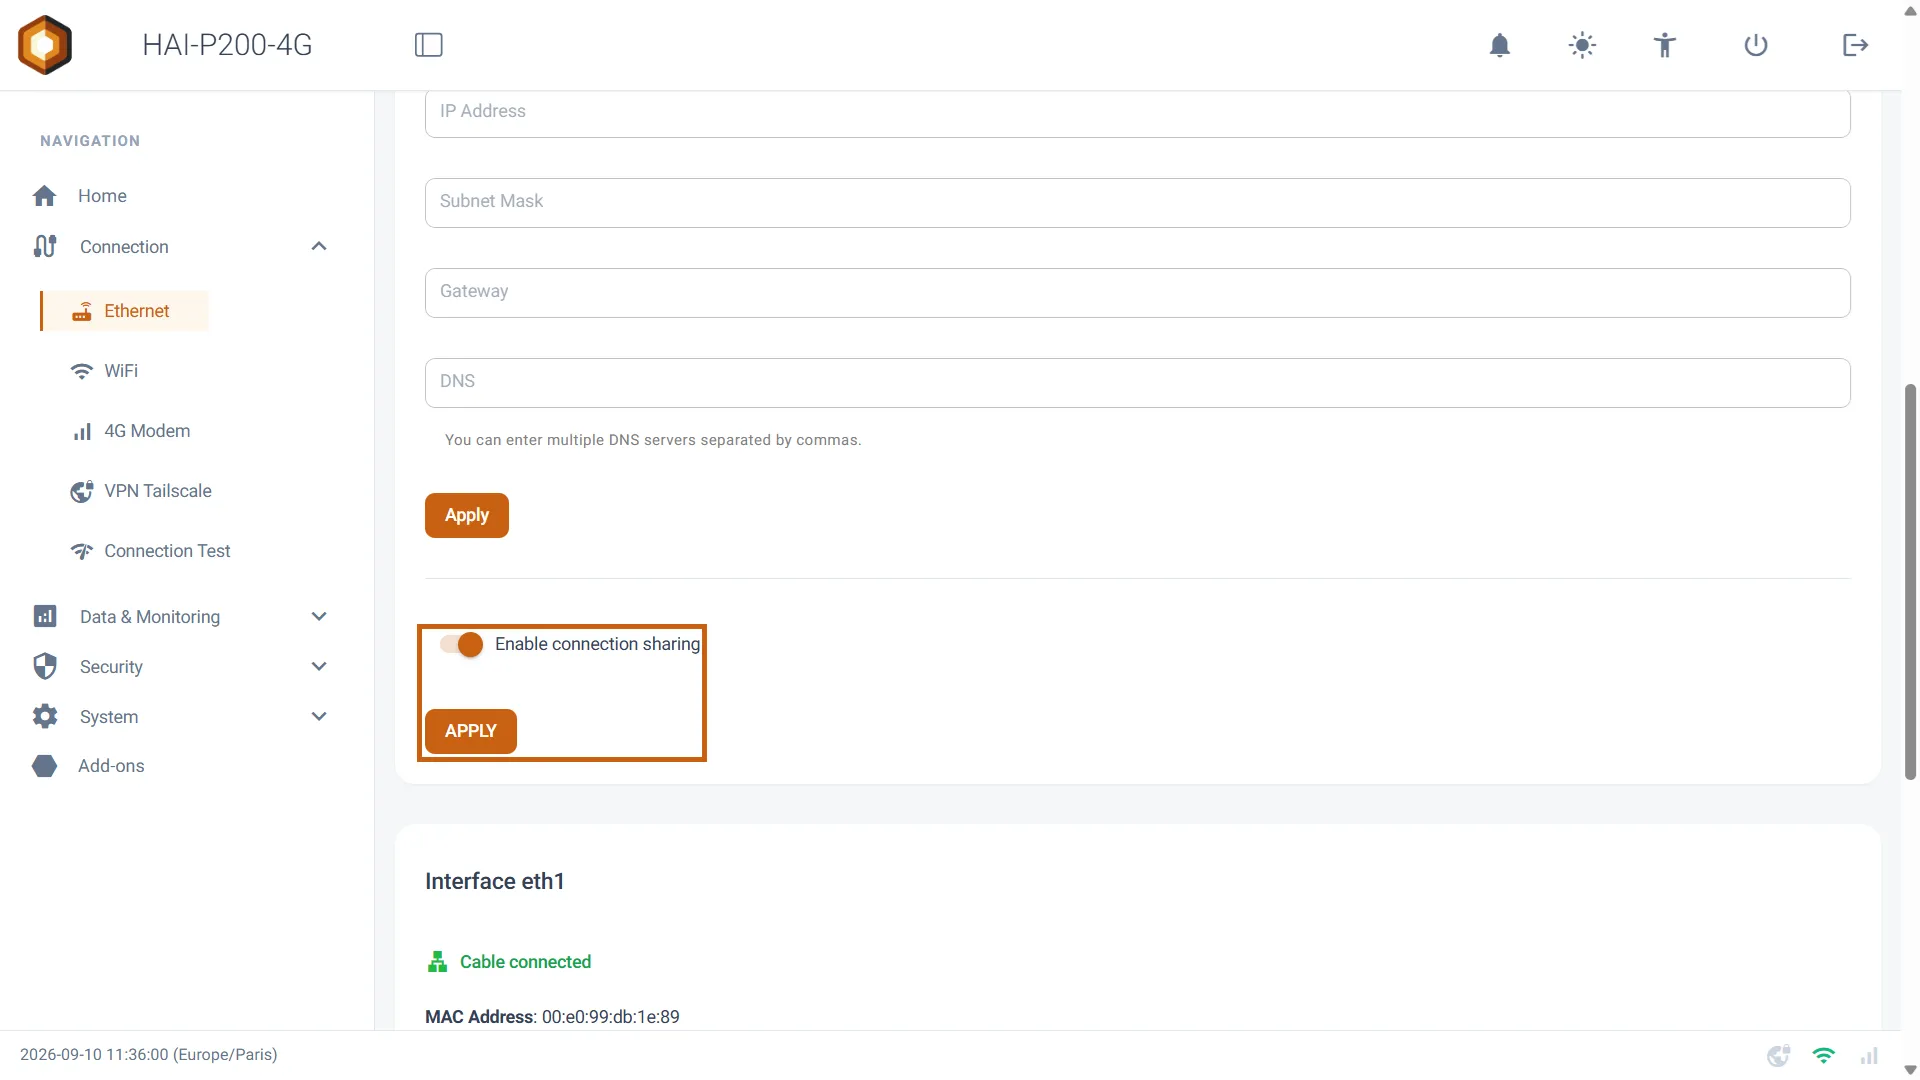
On the equipment side, configure a static IP address on eth1’s network, with the controller as the gateway and the DNS server. With the factory configuration:
| Equipment setting | Value |
|---|---|
| IP address | 192.168.1.x (other than .16) |
| Mask | 255.255.255.0 |
| Gateway | 192.168.1.16 |
| DNS | 192.168.1.16 |
Sharing is restored automatically at every start-up, even if the source link takes a while to come up. Only one source can be shared to eth1 at a time: enabling sharing from eth0 disables any sharing from WiFi or 4G, and the switch greys out with the mention (Disabled: sharing on WiFi active) or (Disabled: sharing on 4G active) when another sharing is active.
WiFi (Client mode)
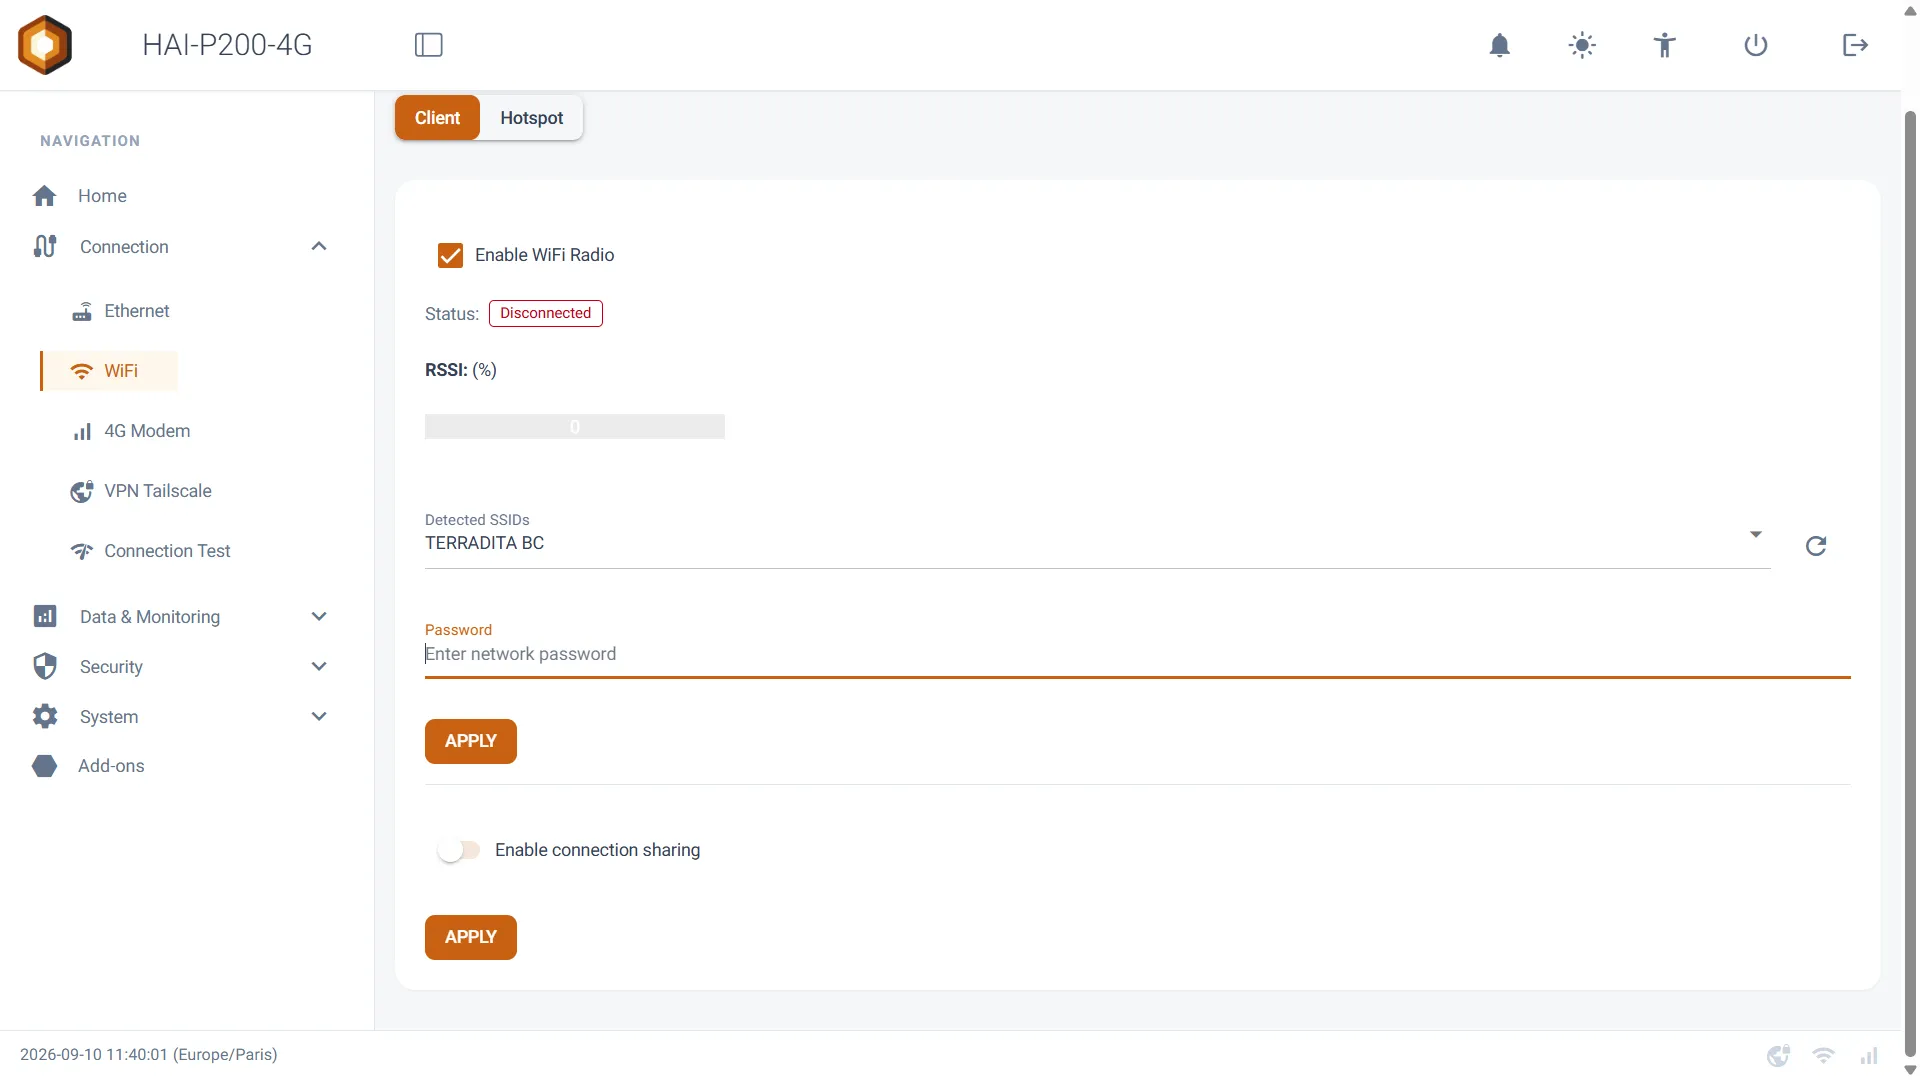
Section titled “WiFi (Client mode)”Go to Connection > WiFi. The selector at the top of the page switches between Client (the controller joins an existing WiFi network) and Hotspot (the controller broadcasts its own network). This guide covers Client mode; Hotspot mode has its own guide, WiFi access point.
Connecting to a WiFi network
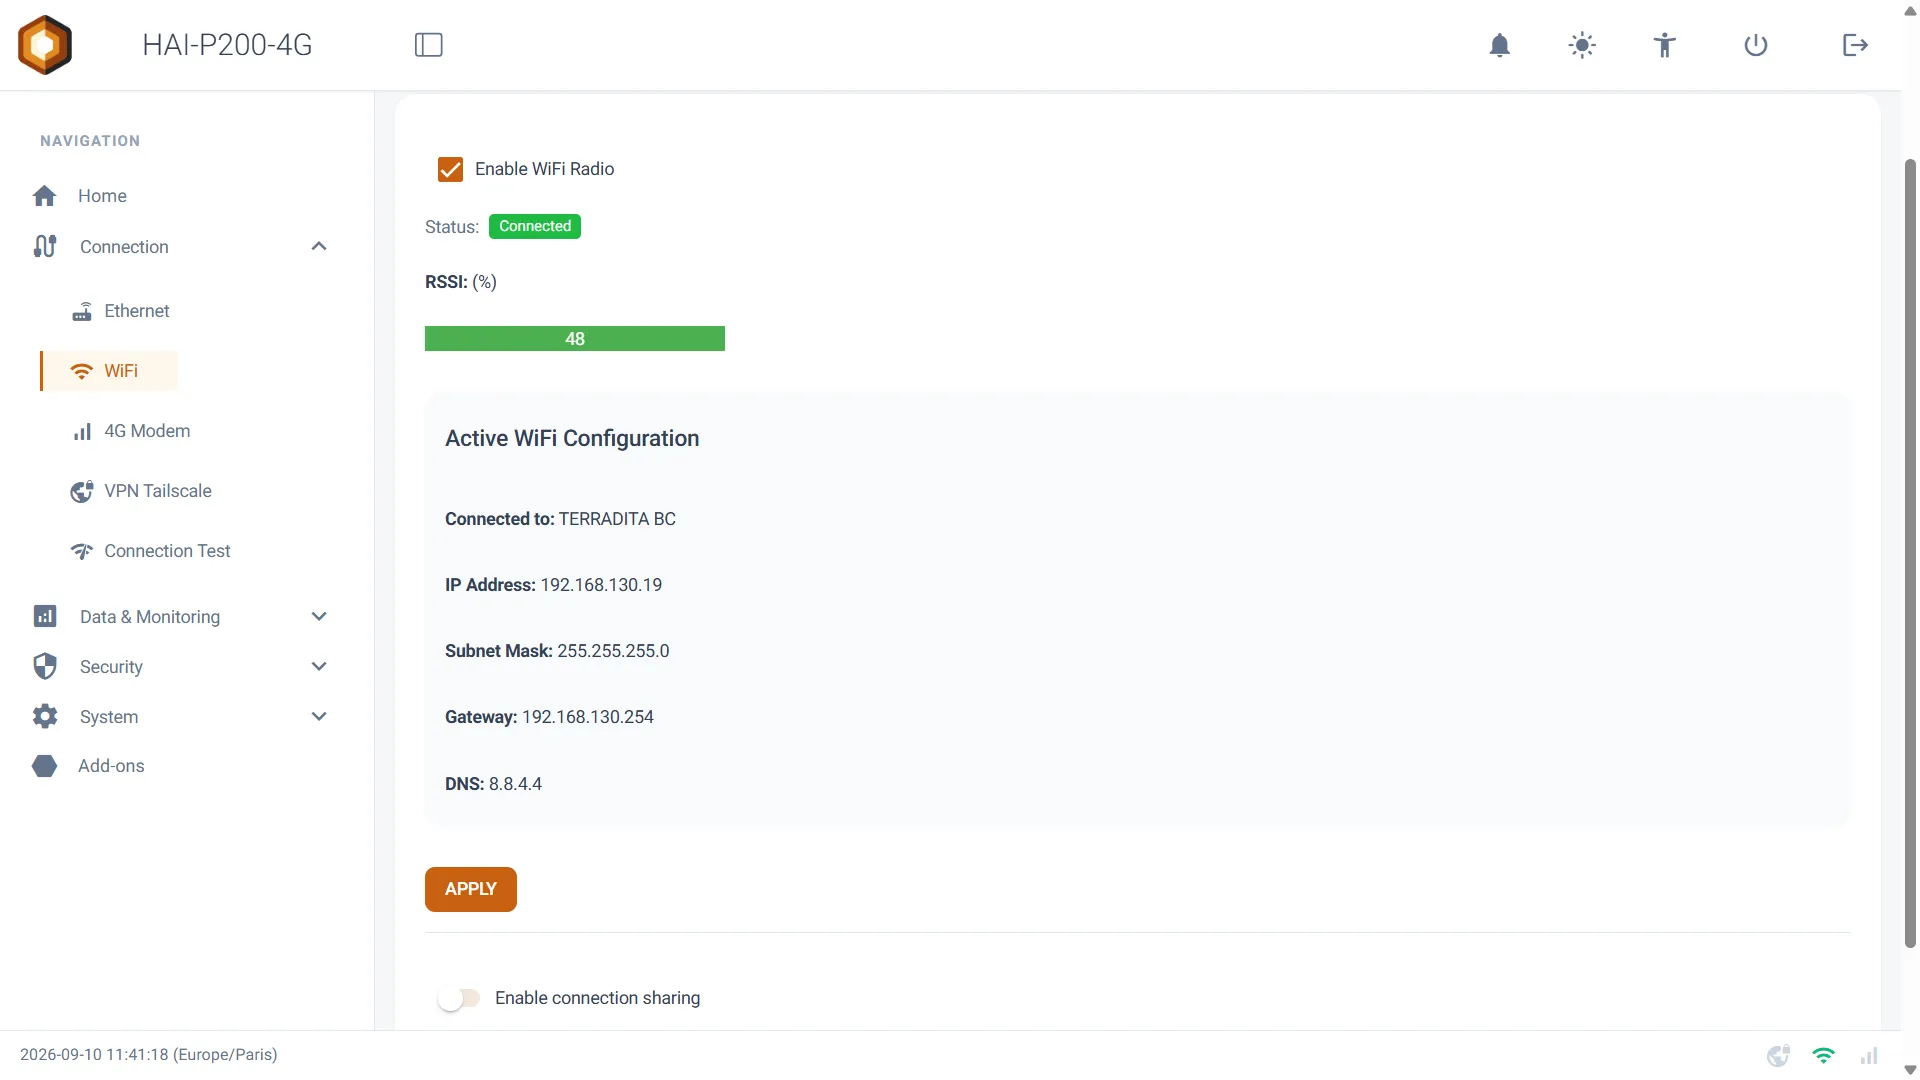
Section titled “Connecting to a WiFi network”- If the radio is off (Radio Off status), tick Enable WiFi Radio then click APPLY. The list of networks appears.
- Click the refresh button to the right of Detected SSIDs to scan for networks. The Scan completed: N network(s) found. notification confirms the scan.
- Select your network in Detected SSIDs. For a hidden network, choose Other and type its name in Enter SSID manually.
- Type the password in Password.
- Click APPLY.
The Connected to
Changing network or disconnecting
Section titled “Changing network or disconnecting”While the controller is connected, the connection fields are hidden.
- Disconnecting: click APPLY. The controller leaves the network (Disconnected from WiFi) and the list of networks reappears; you can then choose another one.
- Turning the radio off: untick Enable WiFi Radio then click APPLY (WiFi radio disabled and disconnected).
Client or Hotspot: a single radio
Section titled “Client or Hotspot: a single radio”The controller has only one WiFi radio: it cannot be a client of a network and an access point at the same time.
- Connecting to a network while the access point is running stops the access point.
- Moving the selector from Hotspot to Client stops the access point and puts the controller back on its remembered network (Access point stopped: wlan0 is back on its WiFi network.). If it has no remembered network, the list of networks is refreshed so you can choose one (Access point stopped. Select a network to reconnect wlan0.).
Sharing the WiFi connection to eth1
Section titled “Sharing the WiFi connection to eth1”Under the Client card, the Enable connection sharing switch, followed by its APPLY button, shares the Internet of the WiFi network joined with the equipment plugged into eth1. The behaviour and the equipment configuration are the same as for sharing from eth0.
That sharing keeps the radio in client mode: the access point then becomes unavailable, and the Hotspot selector greys out with the message Hotspot unavailable: wlan0 is used as a WiFi client sharing its connection to eth1. Disable that share to use the access point.
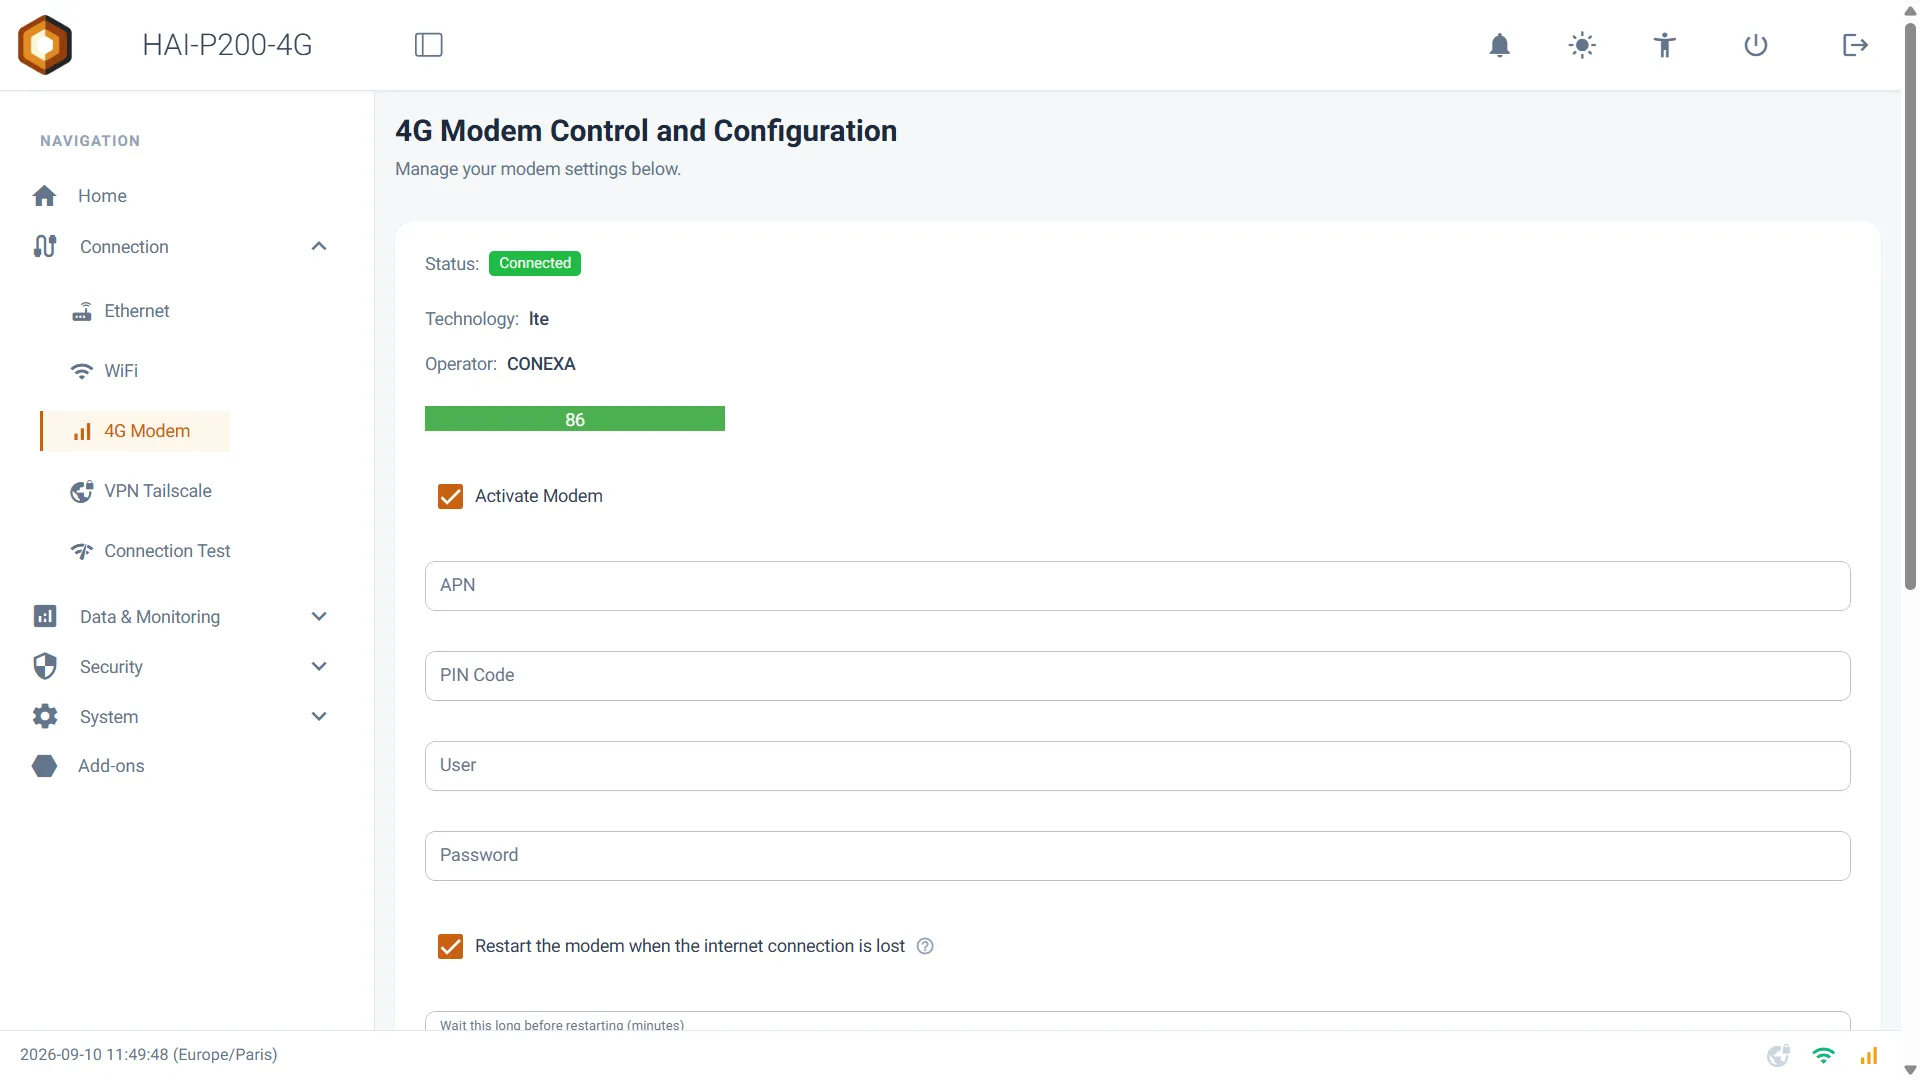
Go to Connection > 4G Modem.
Reading the modem’s state
Section titled “Reading the modem’s state”| Status | Meaning |
|---|---|
| Checking… | The page is querying the modem. |
| No SIM | No SIM card detected. Every setting is disabled. |
| Disconnected | The mobile connection is not established. |
| Connecting… | The modem is attached to the operator’s network, but the Internet does not answer through it yet. |
| Connected | The Internet answers through the modem. |
Once the connection is established, the page shows the Technology (lte, for example), the Operator and the signal quality as a percentage. The state is refreshed every 5 seconds.
Enabling 4G
Section titled “Enabling 4G”- Fill in the APN given by your operator. This field is required.
- If the SIM card is protected, type its PIN Code.
- If your operator requires it, fill in User and Password. Those fields stay empty in most cases.
- Tick Activate Modem.
- Click Apply.
The connection takes from a few seconds to a minute. The notifications follow one another: Connecting modem… Please wait, then Modem connected (nmcli). Validating connectivity…, and finally Modem connected successfully. when the Internet answers through the modem.
If the mobile connection is established but the Internet does not answer yet, the Modem connected, but nothing answered through it yet. The card stays enabled — check the APN and the subscription, or give the network a moment to attach. notification appears. 4G stays enabled: the network can take a while to attach, and the state will update by itself.
Possible error messages:
| Message | Meaning and action |
|---|---|
| Please enter an APN | The APN field is empty. |
| Wrong PIN code ! | The PIN code is refused by the SIM card. |
| No SIM card detected. The modem reports an empty slot — check that the card is fully inserted, the right way round, and in slot 1. | The card is not detected: check that it is inserted and the right way round. |
| No mobile device detected yet. The modem may still be starting up — try again in a minute. | The 4G module has not finished starting up. Try again in a minute. |
| The modem is in a failed state and cannot connect. See the Modem log for the reason reported by the module. | The 4G module is in a fault state. Check the SIM card, then power-cycle the controller. |
| Modem connection failed (nmcli). | The operator refused the connection. Check the APN, the credentials and the subscription. |
Disabling 4G
Section titled “Disabling 4G”Untick Activate Modem, then click Apply. The Modem disconnected. notification confirms the shutdown.
Modem monitoring and automatic restart
Section titled “Modem monitoring and automatic restart”Once 4G is enabled, the controller monitors the connection every minute: is the mobile connection established, and does the Internet answer through the modem?
- If the mobile connection drops, the controller re-establishes it by itself, in three attempts 30 seconds apart.
- If those attempts fail, or if the connection stays established without the Internet answering for too long, the 4G module is power-restarted (by cutting its reset line), provided the option below is active.
Two settings drive that restart:
- Restart the modem when the internet connection is lost: active by default. A ? icon next to it explains how it works.
- Wait this long before restarting (minutes): how long without Internet before the module is restarted, from 1 to 240 minutes. Default: 10 minutes.
The module’s restart obeys a few safeguards:
- never during an alarm voice call;
- never in the first four minutes after the controller starts, to give the module time to attach to the network;
- an increasing delay between two restarts: 5 minutes after the first, then double each time, up to 30 minutes. That counter goes back to zero as soon as the connection returns.
The box’s 4G indicator
Section titled “The box’s 4G indicator”The 4G indicator on the front panel reflects the monitored state:
| Indicator | Meaning |
|---|---|
| Off | No mobile connection, or 4G disabled. |
| Blinking | Mobile connection established, but the Internet does not answer (or no longer answers) through the modem. |
| Steady on | 4G connection with a working Internet. |
Sharing 4G to eth1
Section titled “Sharing 4G to eth1”Under the modem’s settings, the Enable connection sharing switch, followed by its APPLY button, shares the mobile connection with the equipment plugged into eth1. The behaviour and the equipment configuration are the same as for sharing from eth0. Sharing is restored at start-up, including when the modem takes a while to attach: it is enabled as soon as the mobile connection is available.
Reaching the interface remotely over 4G
Section titled “Reaching the interface remotely over 4G”Approximate location
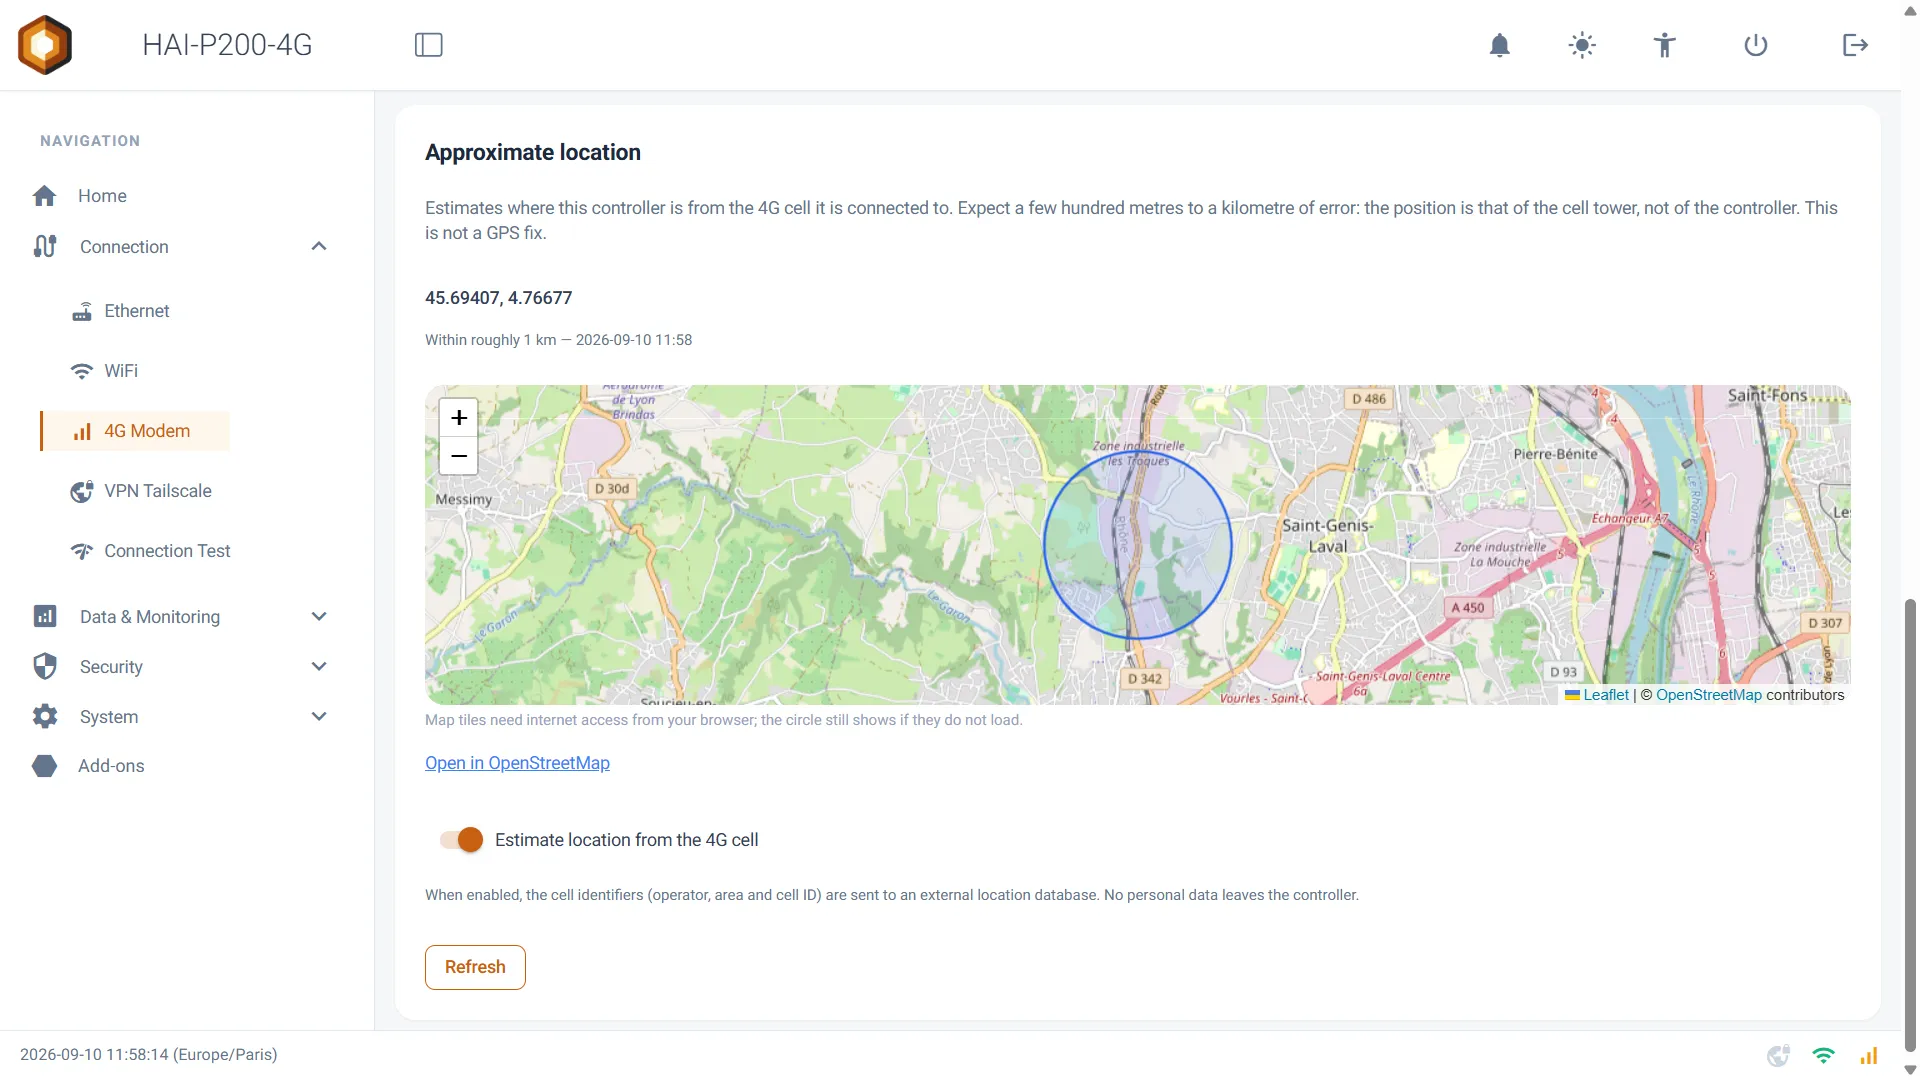
Section titled “Approximate location”The Approximate location card, at the bottom of the page, estimates the controller’s position from the 4G cell it is connected to. This is not a GPS: the position is that of the cell tower, with an error of a few hundred metres to a kilometre.
- Turn on Estimate location from the 4G cell. The search starts immediately.
- The Refresh button runs a new estimation; the Open in OpenStreetMap link opens the position in a browser, and a map is shown on the page.
- The position is also shown on the home page.
This feature is disabled by default: when it is active, the cell’s identifiers (operator, area and tower identifier) are sent to an external location database. No personal data leaves the controller.
Testing a link: Connection Test
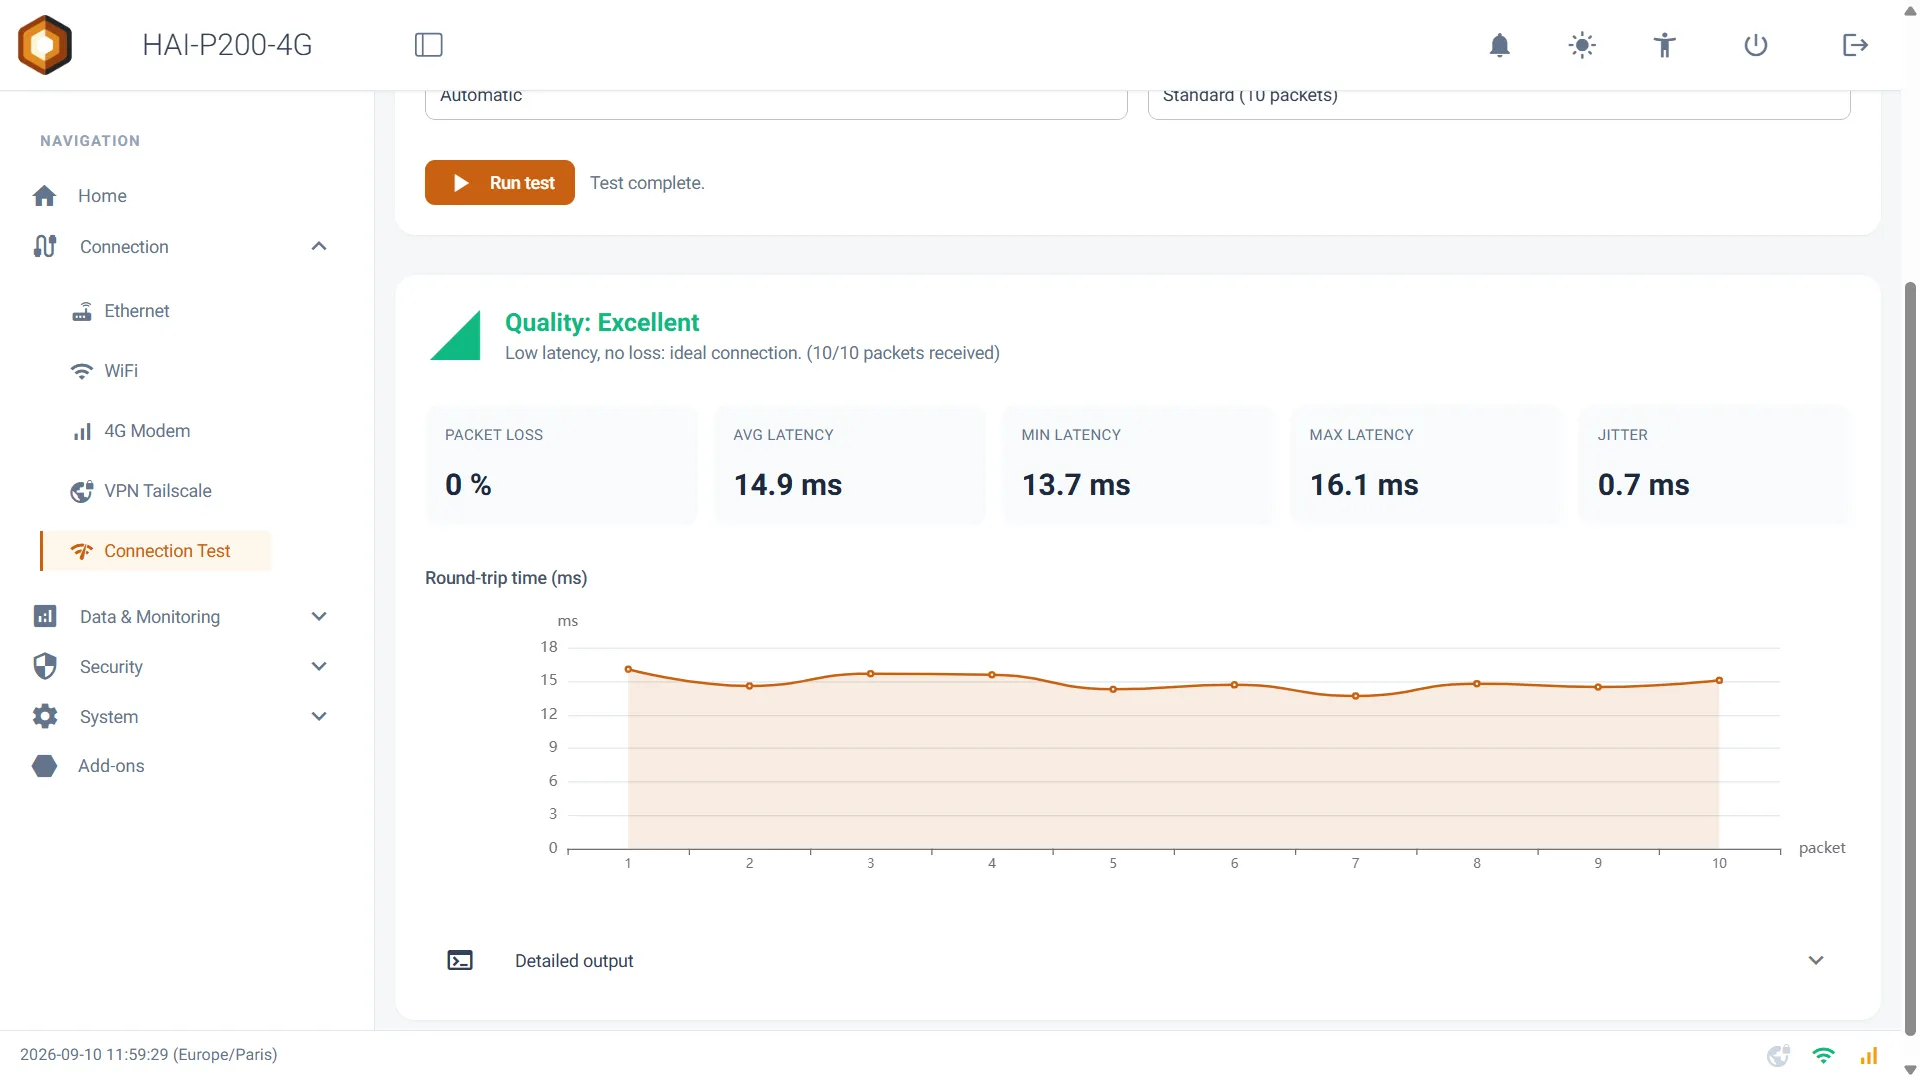
Section titled “Testing a link: Connection Test”The Connection > Connection Test page measures a link’s quality with a ping test: latency, jitter and packet loss.
- Choose the target in Target: Google DNS (8.8.8.8), Cloudflare DNS (1.1.1.1), Google (google.com), Network gateway (the gateway currently in use) or Custom target… to type an address or a host name.
- Choose the link in Network interface: Automatic lets the controller use its current Internet output, or force eth0, eth1, wlan0 or wwan0.
- Choose the length in Test length: Quick (5 packets), Standard (10 packets) or Thorough (20 packets).
- Click Run test. The Stop button interrupts a test in progress.
The results show a quality banner, the Packet loss, the Avg, Min and Max latencies, the Jitter, a curve of the response times and, under Detailed output, the test’s raw output.
Troubleshooting
Section titled “Troubleshooting”| Symptom | Likely cause and action |
|---|---|
| Cable connected but no Internet output badge | The network connected has no gateway, or does not reach the Internet. Normal for a PLC network. Test the link in Connection Test with the interface forced. |
| The Ethernet page stops answering after Apply | You changed the address of the port you were connected through. Reconnect on the new address. |
| A device on eth1 has no Internet | Check that sharing is enabled on a single source, that the device has a static IP with the controller as gateway and DNS, and that eth0 is not on the same subnet as eth1. Re-apply the sharing with APPLY. |
| Connection failed (WiFi) | Wrong password, or network out of range. Run another scan and check the signal level. |
| No WiFi network found. | No network detected. Check the antenna and the range, then scan again. |
| Access point still running on wlan0: stop it to scan for networks. | The access point is running: move the selector to Client to stop it before scanning for networks. |
| Failed to enable WiFi radio | The radio could not switch on. Try again; if the problem persists, restart the controller. |
| A Connecting… status that persists (4G) | The modem is attached to the network but the Internet does not answer: wrong APN, data plan exhausted or not activated. If the automatic restart is active, the module is restarted once the configured delay has passed. |
| A No SIM status although a card is inserted | Card badly inserted or the wrong way round. Reinsert it, then restart the controller for immediate detection. |
| The 4G indicator blinks permanently | Mobile connection established with no Internet. Same diagnosis as Connecting…. |
| The interface is unreachable at the SIM’s IP address | Normal behaviour: the interface does not answer over 4G. Use the Tailscale VPN. |